Best practices for data science in transport planning
1 Introduction to Version control
1.1 Git
Working with code/scripts/notebooks usually involves preparing them, revising and editing their content, and sharing with others. After completing at least one round of this process you can end up with several different versions of the same file. Are you familiar with Figure 1?
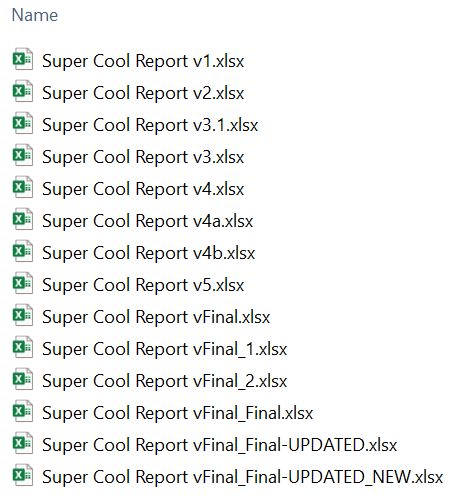
Git is a great tool that tracks changes to files over time, especially in text-based files such as scripts, allowing multiple people to work on the same project without overwriting each other’s work. When Git is used as a version control system, a full copy of the entire project history is stored, making it easy to keep track of any changes, and even revert any changes. By using Git, it is possible to have different alternative versions of the same project, i.e. repository, without the need for independent files or folders for each version.

1.2 GitHub
GitHub is a platform that provides hosting for Git repositories. As a cloud-based service GitHub works as a Hub for storing, sharing and collaborating with others. Some tools in GitHub, like pull requests for proposing changes, reviews for asking others to check your work, and issue tracking for monitoring things to be corrected or improved, ease the collaborative work in different projects. Other features (GitHub Actions) allow the automation of different processes, for example, building a web, and testing and deploying code.
To learn more about the different elements in GitHub, you can start exploring the GitHub skills courses.
1.3 Working with GitHub
Any Data Science project will benefit from having a clear file structure. The starting point will be a folder (a.k.a. repository) in which we will store the code, data and other relevant files. We are going to use both Git and GitHub for keeping track of all changes.
You might already be familiar with some key terms in a typical Git workflow: clone, commit, push, pull, or branch. Here is a useful cheat sheet.
There are two main ways of working with GitHub repositories in your machine: the gh command-line tool from the shell and the GitHub desktop graphical user interface. It is also possible to use the built-in IDEs’ extensions, but they generally have fewer features available. We will explore the different actions in the next session.
1.4 Navigating GitHub
1.4.1 Using the gh command line interface (CLI)
You can search repos, commits, issues, pull requests, and code with the gh CLI tool. For example, to search for repositories related to “transport” sorted by the number of stars, you can run:
gh search repos --topic transport --sort stars --limit 5That outputs the following:
Showing 5 of 1081 repositories

NAME                    DESCRIPTION                                                                                   VISIBILITY  UPDATED
gboeing/osmnx           Download, model, analyze, and visualize street networks and other geospatial features fro...  public      about 10 hours ago
eclipse-sumo/sumo       Eclipse SUMO is an open source, highly portable, microscopic and continuous traffic simul...  public      about 19 minutes ago
Haivision/srt           Secure, Reliable, Transport                                                                   public      about 6 hours ago
enisdenjo/graphql-ws    Coherent, zero-dependency, lazy, simple, GraphQL over WebSocket Protocol compliant server...  public      about 6 hours ago
gboeing/osmnx-examples  Gallery of OSMnx tutorials, usage examples, and feature demonstrations.                       public      about 16 hours ago
You can search for repos related to transport data science with the following and similar commands, as shown in Figure 2.
gh search repos "transport data science" --sort stars --limit 5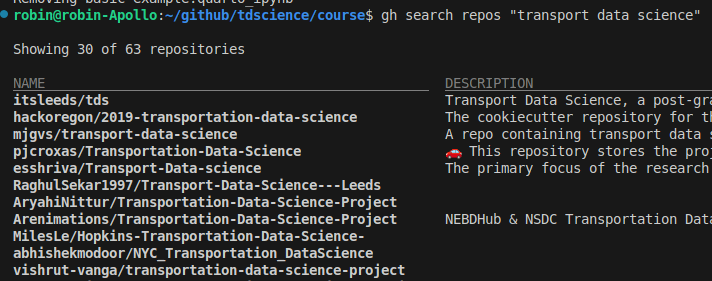
See the gh CLI manual for more details.
1.4.2 Exploring GitHub’s web interface
After you have logged into github.com, you can use the web application to explore open source software. You can search for people’s profiles and repositories (the public ones) using the search bar. Try looking for a topic, package, or researcher/developer whose work interests you.

When you access any public repository, you will typically see the same information in a similar layout:
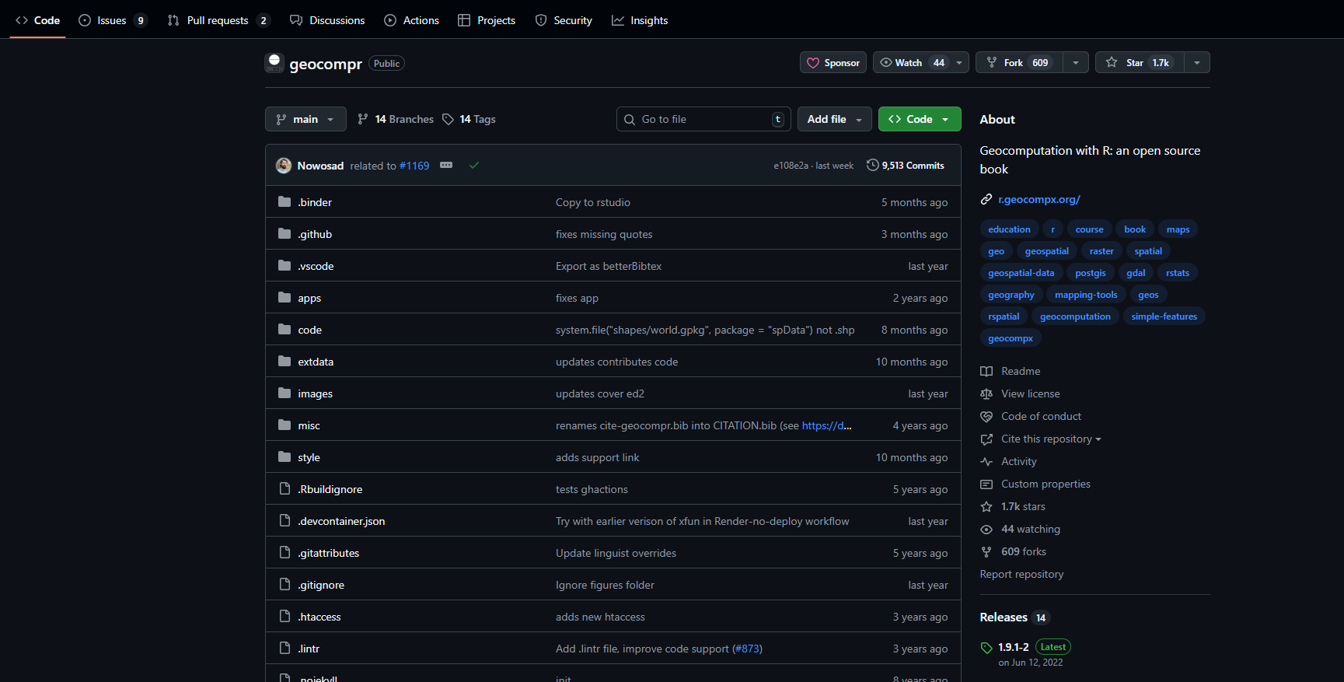
GitHub organizes a repository’s content and collaboration tools into several key tabs. These tabs act as a dashboard, each providing a different view of the project’s status and activity.
1.4.3 The Main Tabs
- Code: This is the repository’s home page. It displays the project’s file and folder structure as it currently exists on the main branch. You can browse and view all the code, read the README file, and see the latest commits, providing a snapshot of the project’s current state.
- Issues: This tab is a central hub for tracking tasks, bugs, and feature requests. It’s a key collaboration tool where developers can open new issues to report problems, ask questions, or propose new ideas. The discussion around an issue is contained in a single thread, keeping conversations organized and searchable.
- Pull requests: When a contributor wants to merge their changes from one branch into another, they create a pull request. This tab lists all open, closed, and merged pull requests. Pull requests are where code review happens; collaborators can discuss the proposed changes, add comments, and approve the code before it is integrated into the main project.
- Discussions: This tab is a more free-form space for conversations that are not tied to a specific bug or feature. It is a place for general questions, project announcements, or sharing ideas with the community. Think of it as a forum built right into the repository, allowing for broader, non-code-related conversations.
1.5 Creating and managing repositories
You can create a repository from scratch or using an existing folder. The following instructions show the basic process for creating a new repository, which will create a Git repository on your machine and upload it to GitHub.
You can use the gh command line interface (CLI) or a graphical user interface (GUI) like GitHub Desktop to create and manage repositories.
While both approaches work, we recommend using the gh CLI because, after you have learned the commands, it is faster, more flexible, and easier to automate repetitive tasks.
If you want to create a repository using an existing folder, make sure to navigate to that folder in your terminal before running the gh repo create command.
To create a repository from scratch, go to the location where you want to create your project using the shell, then run gh repo create to access the interactive mode.
We will select the first option:
? What would you like to do?  [Use arrows to move, type to filter]
> Create a new repository on github.com from scratch
  Create a new repository on github.com from a template repository
  Push an existing local repository to github.com
Assign a name. Remember that this will create a new folder with that name. We will call it myrepository.
? Repository nameNow select the owner of the repository, in this case, your username on GitHub.
? Repository owner  [Use arrows to move, type to filter]
> yourGHname
You can provide a description for the repository. This can be edited afterwards.
? Repository owner yourGHname
? Description
You can choose whether your repository will be private or public. This can also be changed afterwards.
? Visibility  [Use arrows to move, type to filter]
> Public
  Private
The next steps will ask if you want to add README, .gitignore, and license files to your repository. A README file typically explains what the project is, why it is useful, and how others can get started using or contributing to it. A .gitignore file is a plain text file that tells Git which files or directories to intentionally ignore and not track. This is crucial for keeping a repository clean and secure. There are readily available templates based on programming languages; you can pick R in this case. Finally, the license file, if created, clearly states the legal terms under which the project’s code is distributed.
After all questions, the interactive assistant will confirm if you want to create the repository.
? Would you like to add a README file? Yes
? Would you like to add a .gitignore? Yes
? Choose a .gitignore template R
? Would you like to add a license? Yes
? Choose a license GNU Affero General Public License v3.0
? This will create "myrepository" as a public repository on github.com. Continue? (Y/n)
Confirm your repository and explore its contents!
Open the GitHub Desktop app. Click on the File menu and select New repository...

A window asking for the details of your repository will appear.
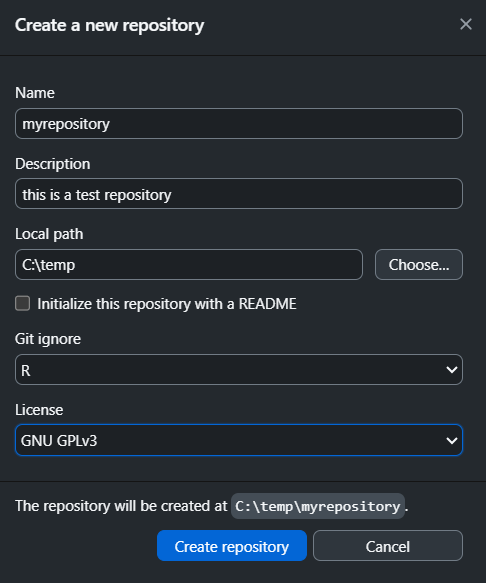
A .gitignore file is a plain text file that tells Git which files or directories to intentionally ignore and not track. This is crucial for keeping a repository clean and secure. There are readily available templates based on programming languages; you can pick R in this case. Finally, the license file, if created, clearly states the legal terms under which the project’s code is distributed.
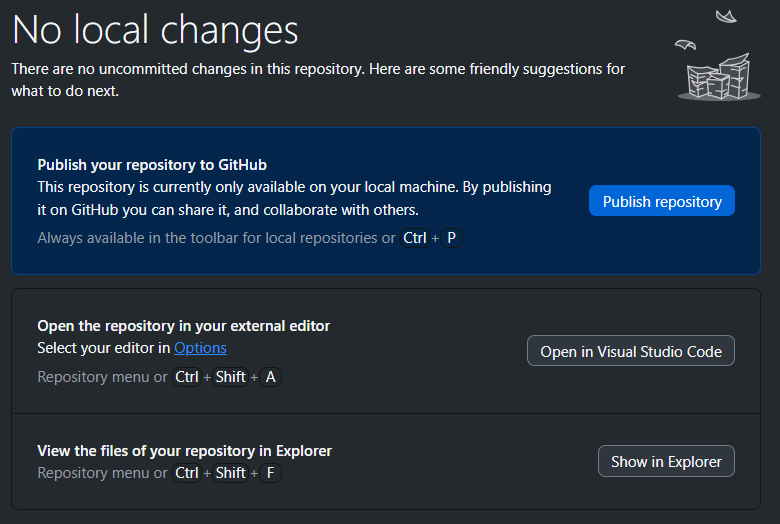
This process will create the repository locally. In order to publish it on GitHub, you have to click on Publish repository.
Once your repository is created, you should be able to see it online. To access it, click on the Repositories tab in your profile page and select the repository you just created. You can see a list of repositories in your profile page by clicking on the Repositories tab, or typing github.com/username?tab=repositories in your browser, replacing username with your GitHub username. To see robinlovelace’s repositories, for example, you can type the following into your browser: github.com/Robinlovelace?tab=repositories.

If you want to create a repository from an existing project, you will need to initialize your repository. For this, go to the folder where you have your project with cd <folder path>, and run git init. This will create a local repository.
To be able to use git in the command line, you need to have installed it from here
1.6 Cloning and Forking repositories
To work on a project from GitHub, you first need to create a local copy of the project/repository in your machine. This is referred as cloning the repository. Cloning creates an identical copy of the project, with all the files and their history. If you want to work on someone’s repository and make some changes, you should fork it first. Forking a repository, creates a copy of the project in you own GitHub account, allowing you to make changes and, potentially, contributing to the code/work of others.
Go to the location where you want to store the repository and run: gh repo clone username/repositoryname Replace username/repositoryname with the actual repository path on GitHub.
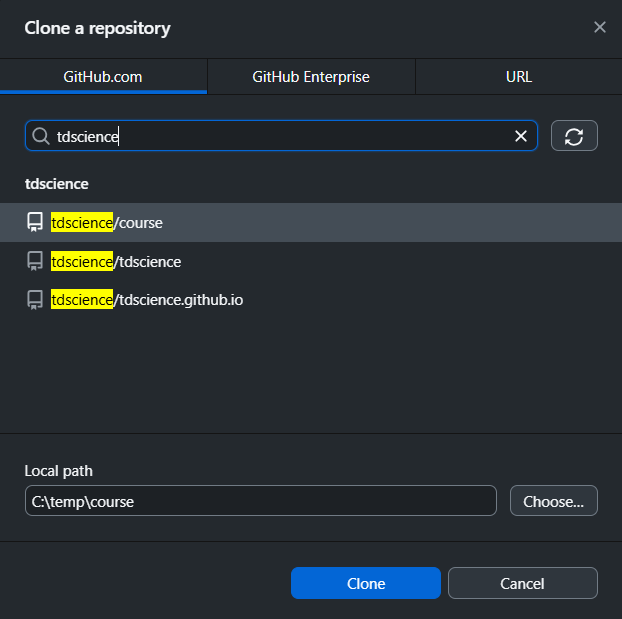
Click File > Clone repository, search for the repository, and choose a local path.
1.7 Making changes and committing
A key part of version control is recording the changes in the repository. Once you have created or deleted files, or made any changes, you need to commit them to save a snapshot of your work. In the diagram below, each dot is a commit with a set of changes.
To commit changes, you will first need to stage the files containing the changes. Staging means selecting what goes into the
From the terminal, you can stage a file with the following code:
git add <filename>Alternatively, if you want to stage all files you can use
git add .Then, to finally commit changes, use the following code:
git commit -m "Describe your changes"It is good practice to use concise but clear messages to describe what the change was.
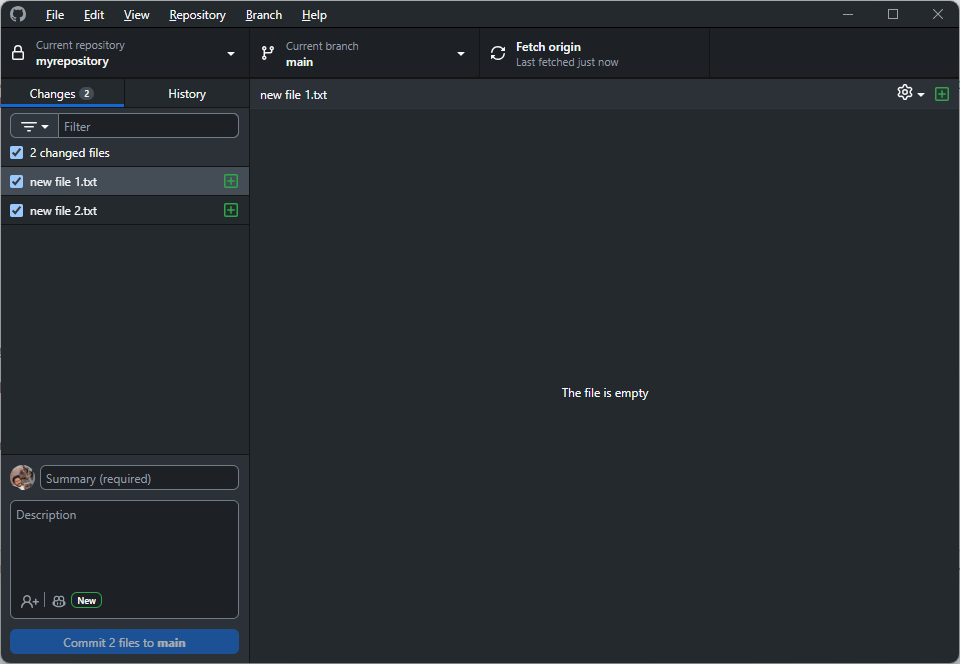
In GitHub Desktop, changes are shown automatically. You may select the files that you want to include in the commit (stage them). Add a descriptive message and click “Commit to main”.
1.8 Pushing changes to GitHub
Using git gives you full control of the version control process. This means, that you decide when to publish/synchronise what you have done to the cloud. To update a repository on GitHub with your local commits, push your changes:
From the terminal, use the following code to push your changes to the cloud:
git pushClick “Push origin”.

1.9 Collaboration with GitHub
GitHub enables collaboration by allowing multiple people to work on the same repository. You can use Issues and Discussions to communicate. Imagine that you are working on some analysis in a team. One person in the team identifies a problem with the analysis. That person can open an issue to inform the rest of the team about this problem.
Using the command line, you can create an issue by running:
gh issue createOn the repository’s site, go to the Issues tab, and then create an issue.
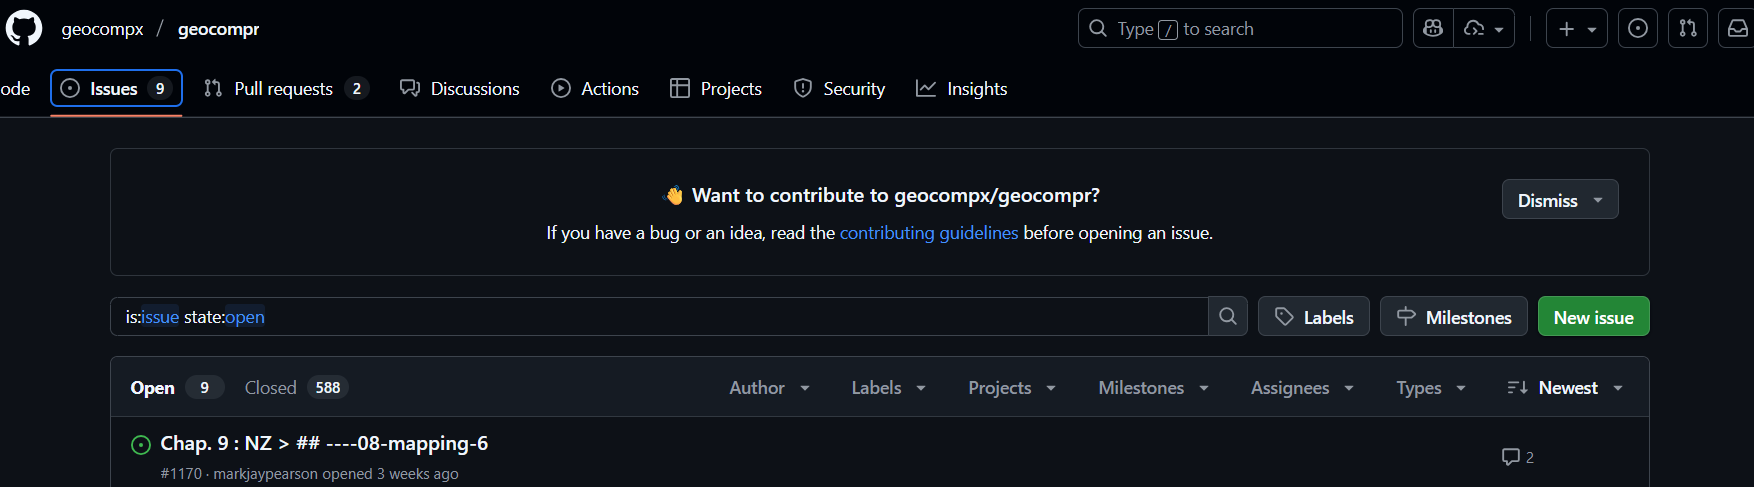
1.10 Branches and pull requests
Branches let you work on new features or fixes without affecting the main codebase. When you create a branch, you effectively create a snapshot of the project at that point and use it as a starting point. It is recommended that you create a branch based on an existing issue, so there is some traceability of why there is a new variation of the project.
Each issue is assigned a unique numeric ID that you can use to create a branch:
To list all the issues in your repository you can run:
gh issue listTo create a branch from an issue, e.g. #3, you can run:
gh issue develop 3 --checkoutUsing --checkout will move you from the main version of the project to the version where you are going to do the work to implement the solution to the issue. You can now start working and committing all necessary changes without affecting the main project. If you need to return to the main branch, you can run git checkout main.
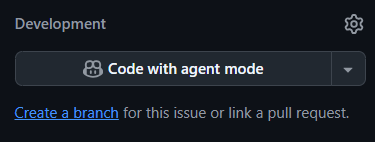
If you open the page of an issue in your repository, you should be able to create a branch from the Development section in the side panel on the right.
Then switch to the branch from the home page of the repository.

Once you have finished working with your branch, you can create a pull request so the changes are incorporated into the main version.
Using the command line, you can create a pull request by running:
gh pr createIn GitHub Desktop, every time you commit a change on a different branch to main, it will ask you if you want to create a pull request.
After creating a pull request, the owner of the repository, reviews and approves your contribution.
1.11 Merging changes
if you are the owner of a repository and you receive a pull request. You can review it and merge it into the main branch.
On GitHub, click “Merge pull request”.
Locally, use:
gh pr merge 1
1.12 Resolving conflicts
Conflicts occur when changes in different branches overlap. Git will mark the conflicting files.
Open the file, look for conflict markers (
<<<<<<<,=======,>>>>>>>), and edit to resolve.After resolving, add and commit the file:
git add <filename>
git commit
1.13 Automated workflows with GitHub Actions
GitHub Actions lets you automate tasks like testing or deployment.
- Add workflow files in
.github/workflows/. - Example: Run tests on every push.
1.14 Best practices for collaboration, sharing code and data
- Write clear commit messages.
- Use branches for features and fixes.
- Keep your repository organized with README, .gitignore, and license files.
- Communicate using Issues and Discussions.
- Review code via pull requests.
- Protect sensitive data by not uploading secrets.
2 Introduction to Quarto
Quarto is a next-generation open-source publishing system that allows you to combine text, code, and the output of that code into a single document. It is designed for technical and scientific communication, enabling the creation of reproducible documents that can be published in a wide variety of formats. You can use Quarto to produce reports, journal articles, presentation slides, books, and dashboards.
2.1 Quarto projects
Quarto documents are authored in a plain text format, using a markup language called Markdown. A markup language is a system for annotating a document using a set of tags or symbols to define the structure, formatting, and other properties of the text within a digital document. You might be familiar with commonly used markup languages like HTML or LaTeX. These languages make the text readable by both humans and machines. Since Quarto documents are based on plain text files, you can use Git and GitHub for version control.
If you are not familiar with using Markdown, take a look at the short course Communicate using Markdown on GitHub Skills.
A Quarto project has two key parts:
- Source files: These are the individual documents written in Quarto Markdown, typically with a
.qmdextension. They contain the narrative text, code chunks, other blocks, and a header for document-specific options.

qmd file of this website- Project File (
_quarto.yml): It’s a YAML (YAML Ain’t Markup Language) configuration file that lives in the project’s root directory. It defines global settings for all the documents in the project, such as the project type, metadata, output directories, and project-wide configuration for execution, style, and format. The contents of this file will depend on the type of project you are working on. Here is a sneak peek of the project file for this website:

2.2 Creating a Quarto project
You can create a Quarto project from scratch in an existing repository. First, let’s check that you can use quarto in your command line, and the version you have installed. If you run quarto -v in your shell, you should get the version of Quarto you have installed.
PS C:\temp\tdscience> quarto -v
1.7.34
To create a new project in an existing directory, follow these steps:
- Go to your repository with
cd <path to repo> - Run
quarto create - Choose the name and type of project
- Open the project in your preferred IDE.
As you see in the following code, Quarto will automatically create a source file and the project file.
PS C:\temp> quarto create
? Create » project
? Type » default
? Directory » my-first-quarto-project
? Title (my-first-quarto-project) » My first quarto project
Creating project at C:\temp\my-first-quarto-project:
  - Created _quarto.yml
  - Created My first quarto project.qmd
? Open With
❯ positron
  vscode
  (don't open)
You can also create Quarto projects interactively from the IDE. If you are interested, explore the documentation for RStudio, VSCode, or Positron.
2.3 Blocks/Chunks
Blocks in the qmd files are sections that are processed and formatted in a specific way. Blocks can contain code that can be processed in different ways. Chunks are delimited with ``` at the top and bottom, like this:
```
This is a block
```
Blocks allow you to include content in HTML or LaTeX in the qmd files as raw code. Specifically for equations, you can use $$ as a delimiter. You can find more useful information on how to use Markdown in Quarto in the Quarto documentation.
2.4 Code chunks and settings
Code chunks that have the language name between braces at the start are executed as if you run the code in the console. For example:
```{r}
# this is a code chunk/block that executes R code
a <- 1 + 3
a
```
```{python}
# this is a code chunk/block that executes python code
a = 1 + 3
print(a)
```There are several execution options that are useful, for example, to identify each code chunk, or to hide the code, the output, or both. These options are set in the code chunk header and allow you to precisely manage what is visible to the reader. As an example, the following code will hide the source code and only the output Hello World! will be visible in the rendered document.
```{r}
#| label: hello-block-r
#| echo: false

print("Hello World!")
```
```{python}
#| label: hello-block-python
#| echo: false
print("Hello World!")
```See the full details on execution options here. Other options allow you to reference the output of the block. For example, if your code is producing a figure, you can use the label for cross-referencing (more about this will be detailed in the next session), or to set the caption.
2.5 Publishing your work
Quarto enables you to generate a wide range of output formats from your project, whether you need an HTML report, a PDF article, a slideshow, or an entire website (like this one). From the command line, you can run quarto render to produce the rendered version of your project, or quarto preview to inspect your edits interactively.
Combining Quarto and GitHub helps you make your research transparent, collaborative, and easy to share, ensuring that your work is not just published, but also verifiable and ready for future use.
3 Exercise
For this exercise you will not be creating a repository. Instead you will contribute to an existing repository. You may use the gh command line or the web interface from GitHub.
Follow the following steps
- Fork the following repository:
juanfonsecaLS1/dstp-jf-git-exercise, and, If you haveghor GitHub Desktop installed, clone it in your machine. - Create an issue in your repository.
- Create a branch related to that issue in your repository.
- In the new branch Make a change in the file you are assigned during the session. Then commit the changes.
- If you are working locally, push the changes to GitHub
- Create a pull request