Development environments, system commands, and version control
1 Introduction to IDEs
There are several integrated development environments (IDEs) that provide a comprehensive set of tools and features for data science. IDEs facilitate coding, data processing and analysis, visualisation, and version control. They also help in producing files to share your work, whether you’re using scripts or notebook-style documents. We are going to focus on three IDEs used for R and/or Python: RStudio, VS Code, and Positron. As shown in Table 1, each IDE has its own strengths and weaknesses.
ides = readr::read_csv("data/ides.csv")
Rows: 10 Columns: 4
── Column specification ────────────────────────────────────────────────────────
Delimiter: ","
chr (4): Attribute, RStudio, Positron, VS Code

ℹ Use `spec()` to retrieve the full column specification for this data.
ℹ Specify the column types or set `show_col_types = FALSE` to quiet this message.
knitr::kable(ides, caption ="Comparison of IDEs for Data Science")
Table 1: Comparison of IDEs for Data Science
Attribute
RStudio
Positron
VS Code
Languages
R
R + Python out-of-the-box
Any (with extensions)
Status
Mature ✅
Under development 🏗️
Mature ✅
Setup time
Minimal ✅
Minimal ✅
Extensions needed ⚠️
Quarto
Excellent ✅
Excellent ✅
Excellent (extension) ✅
Devcontainers
❌
❌
✅
Live Share
❌
❌
✅
Extensions
Limited (via Addins) ⚠️
High (OpenVSX) ✅
High (Marketplace) ✅
Codespaces
Limited ⚠️
Limited ⚠️
✅
License
Restrictive open (AGPL) ✅
Source-available (Elastic) ⚠️
Open core (binaries closed) ⚠️
AI integration
Limited ⚠️
High (various extensions) ✅
High (various extensions) ✅
The attributes of RStudio make it a great choice for R users who want a straightforward setup that works out of the box. On the other hand, VS Code and Positron are more flexible and extensible, making them well-suited for people who need to work with multiple programming languages, want to use multiple languages and extensions, or (in the case of VS Code) want to use devcontainers for a consistent and reproducible environment.
1.1 RStudio
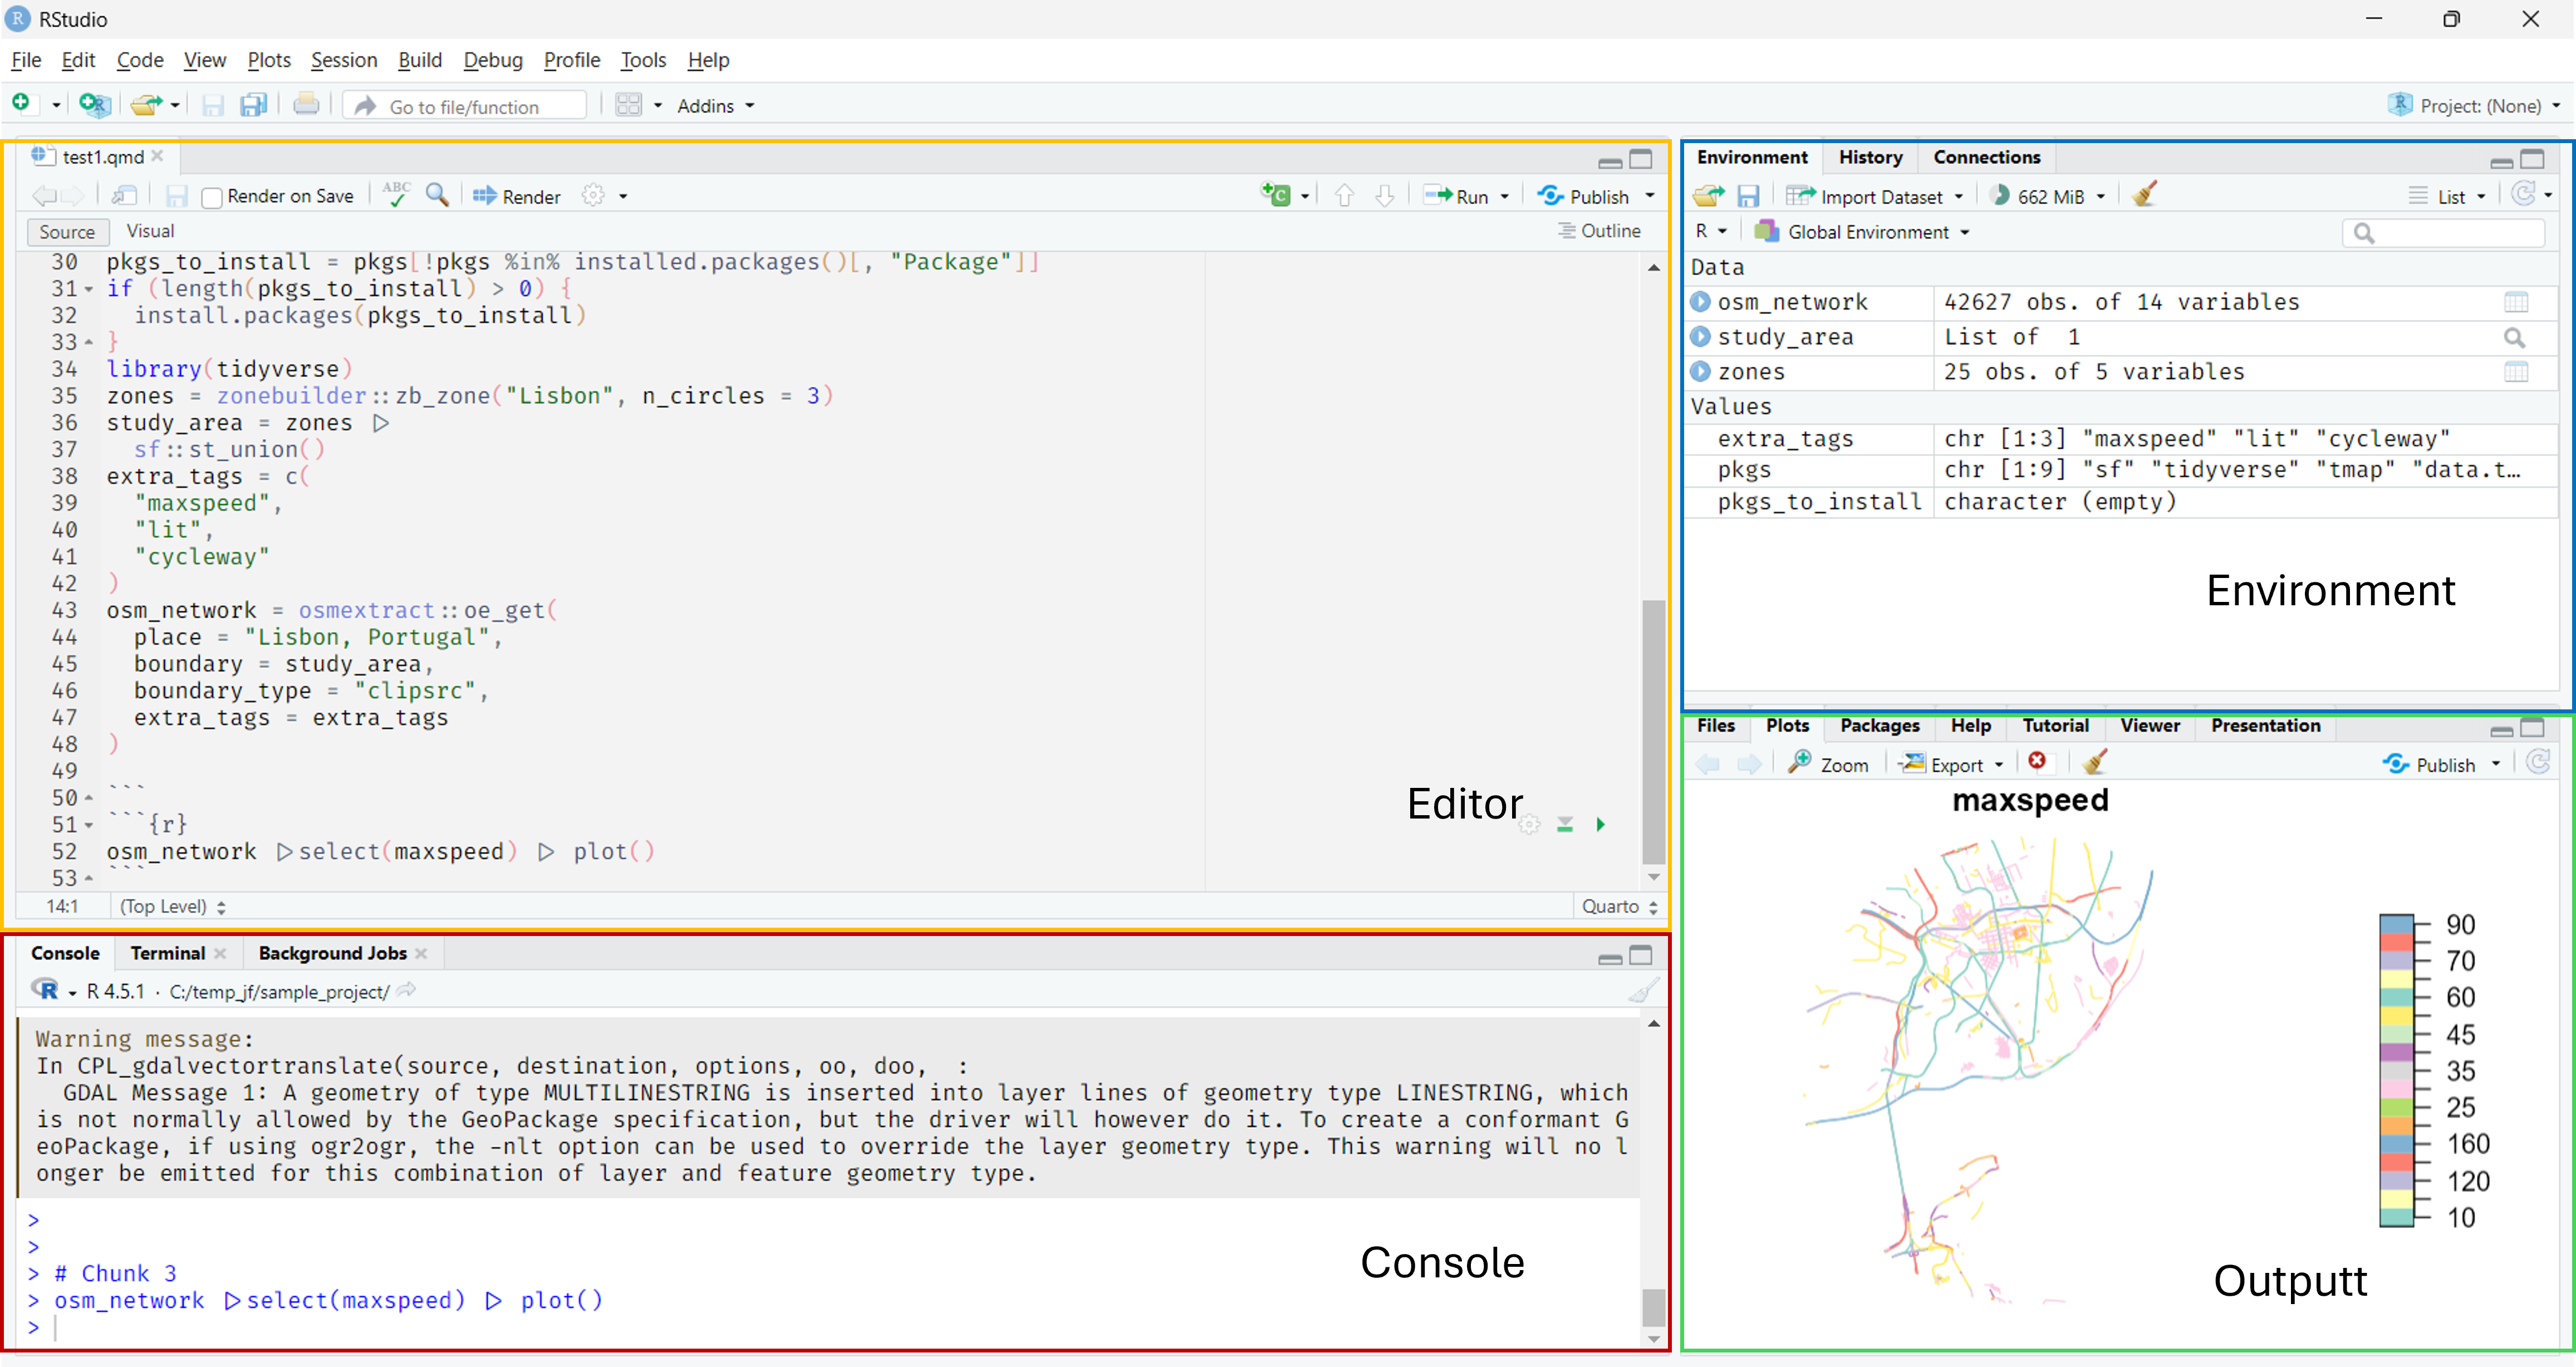
RStudio is an IDE specifically designed for R, a programming language widely used for statistical computing and graphics. It provides a user-friendly interface that integrates a code editor, a console, and tools for plotting, history, debugging, and package management, as shown in Figure 1.
Figure 1: Rstudio layout
1.2 VS Code
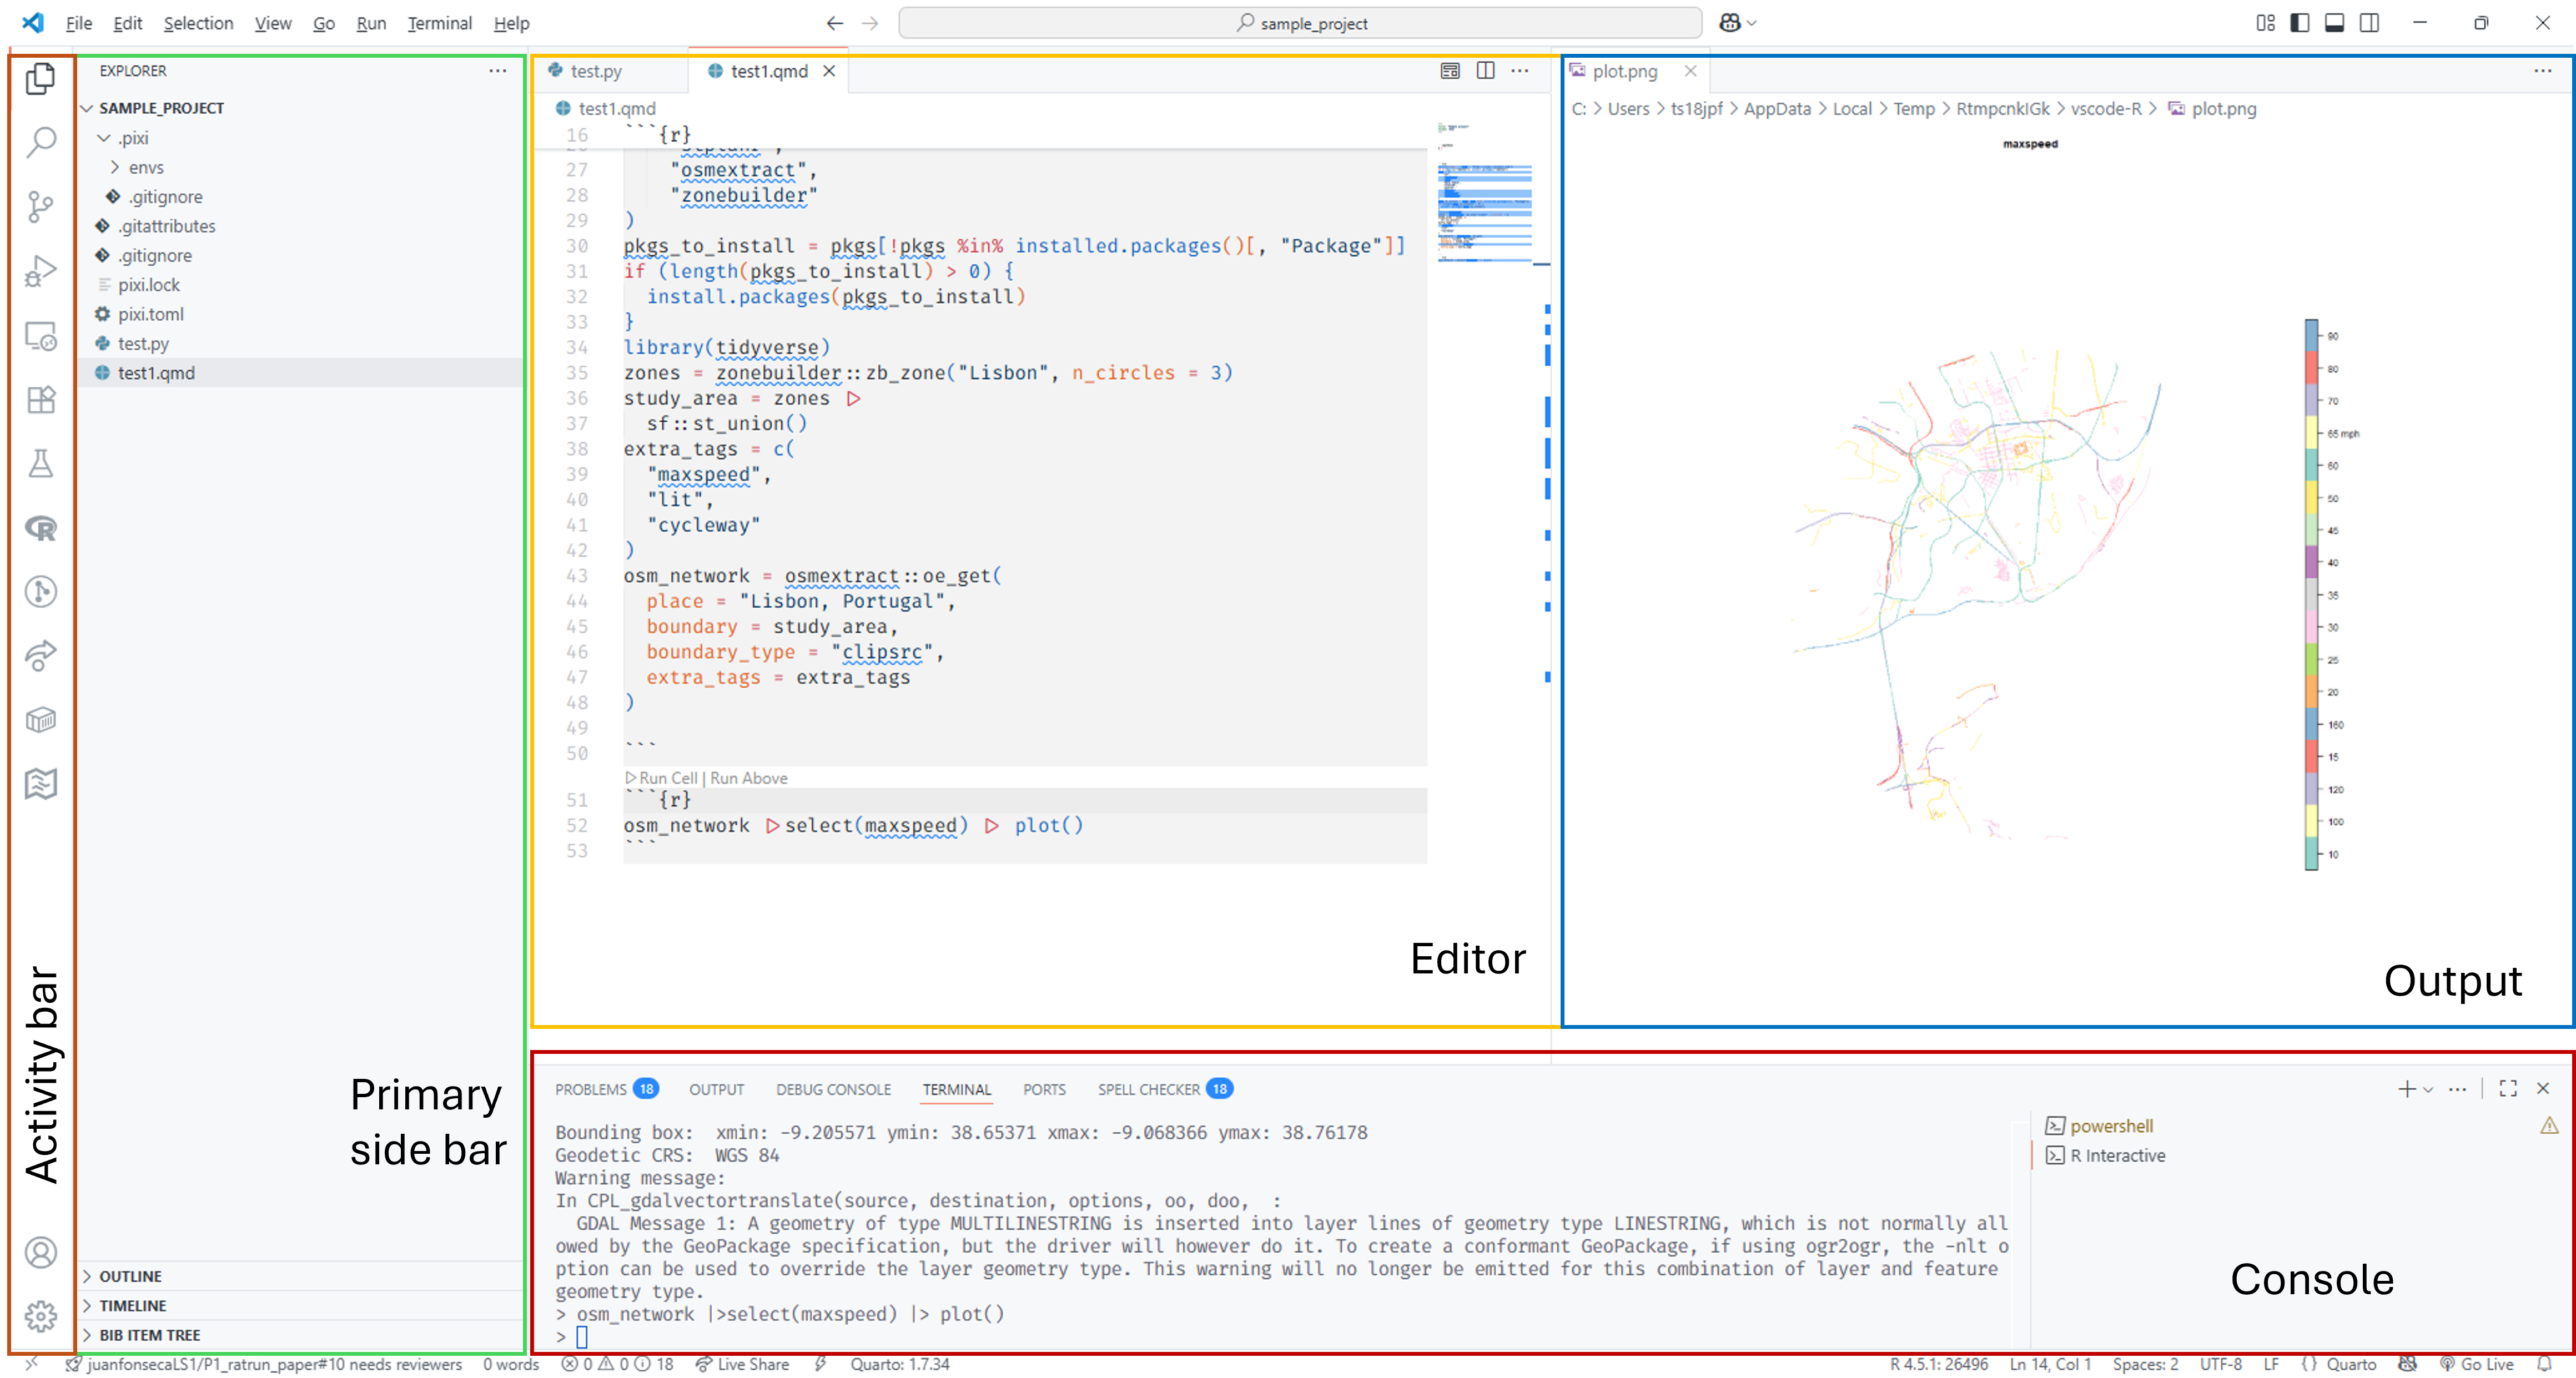
Visual Studio Code (VS Code) is a code editor developed by Microsoft that can be used with a wide range of programming languages, including R and Python. In contrast to RStudio, it is not a full-fledged IDE out of the box, but its rich ecosystem of extensions makes it very flexible for any data science project. See (Figure 2)
Figure 2: VScode layout
1.3 Positron
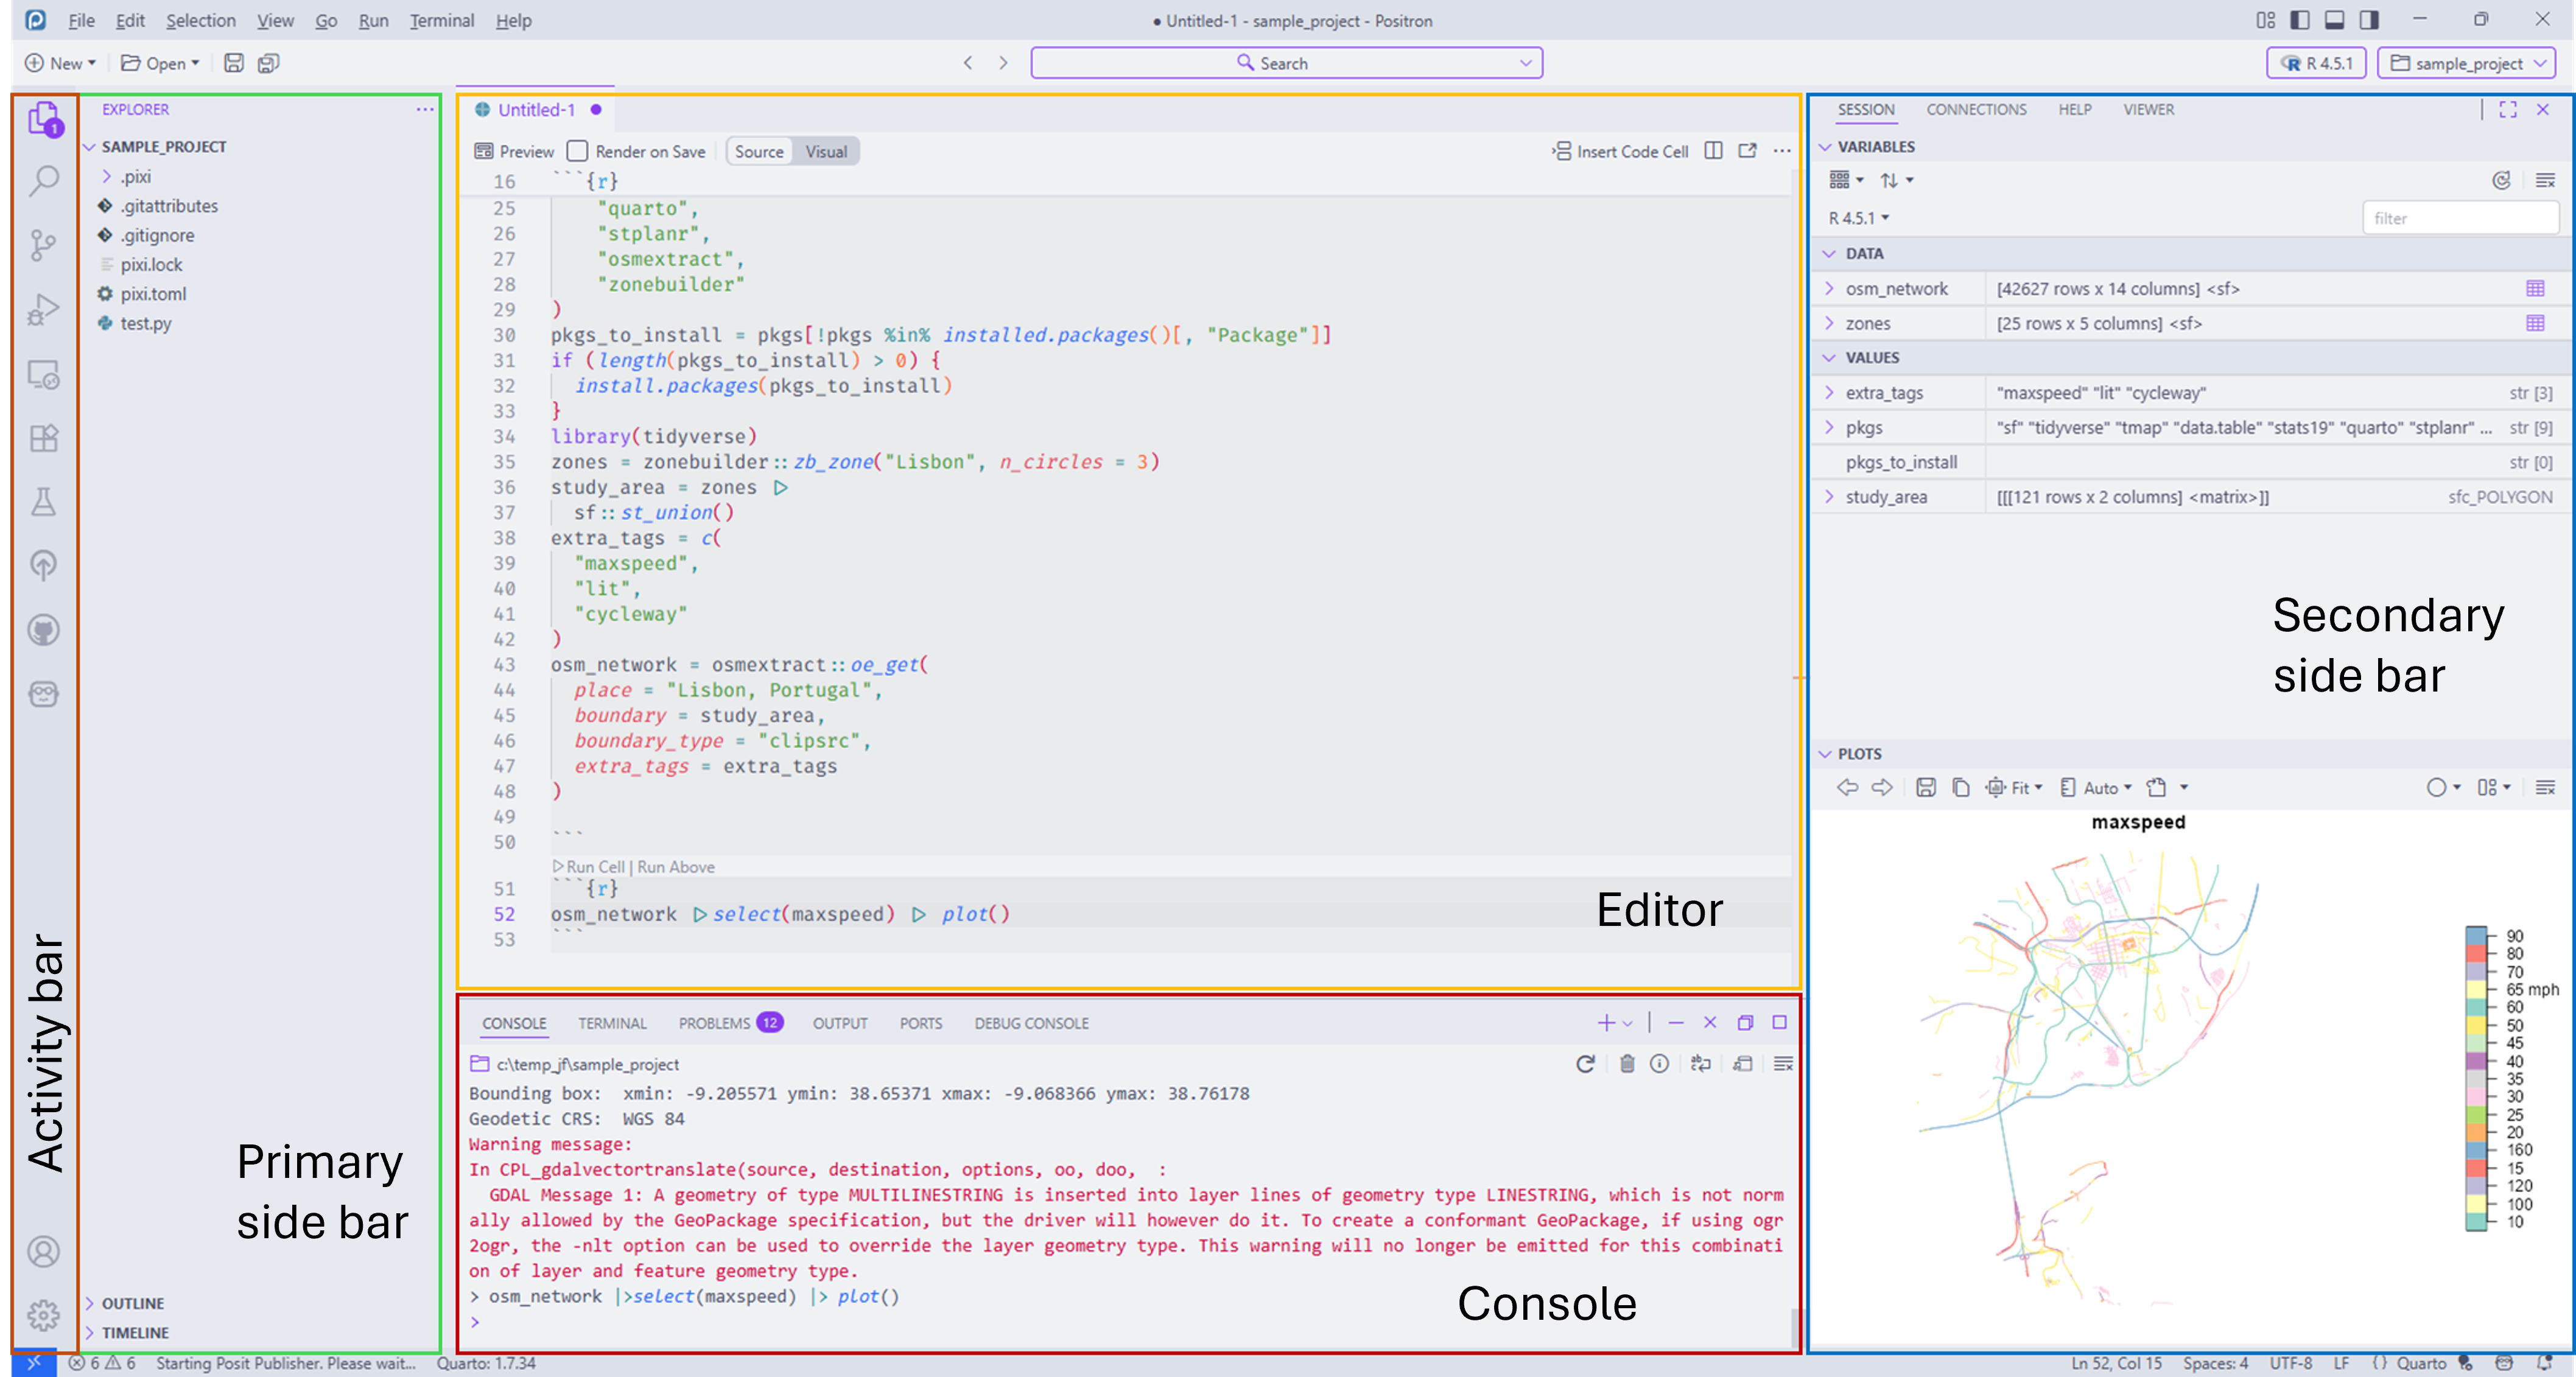
Positron is a next-generation, free IDE for data science developed by Posit, the same company that makes RStudio. Built on the same foundation as VS Code, it is designed to support both R and Python. The interface of Positron integrates elements familiar from RStudio with the flexibility of VS Code.
Figure 3: Positron layout
2 Key features and extensions of VS Code-based IDEs
VS Code’s power lies in its lightweight core and its extensible ecosystem. VS Code extensions support a wide range of languages and frameworks. Here are some of the most relevant
2.1 Core Features
IntelliSense: A code completion engine that provides intelligent, context-aware suggestions for variables, functions, and modules, along with helpful pop-up documentation.
Integrated Git: VS Code has built-in support for Git, allowing developers to manage version control directly within the editor.
Built-in Terminal: An integrated command-line terminal allows you to run shell commands, execute scripts, and manage your environment without switching applications.
Debugging: VS Code includes an interactive debugger that enables you to set breakpoints, inspect variables, and step through code to identify and fix bugs.
We will use only the basic extensions as described in the prerequisites. But it is worth exploring the extensions available on VS Code Marketplace.
2.2 Devcontainers
A development container (devcontainer) is a Docker container that includes all the necessary tools, libraries, and dependencies for a specific development environment. In many ways, it represents best practices for setting up a consistent and reproducible environment for a project, with the only downside of requiring Docker to be installed in your machine.
Devcontainers are ideal for use ‘in production’ in teams that have access to Docker, as they ensure that all team members are working in the same environment, regardless of their local setup.
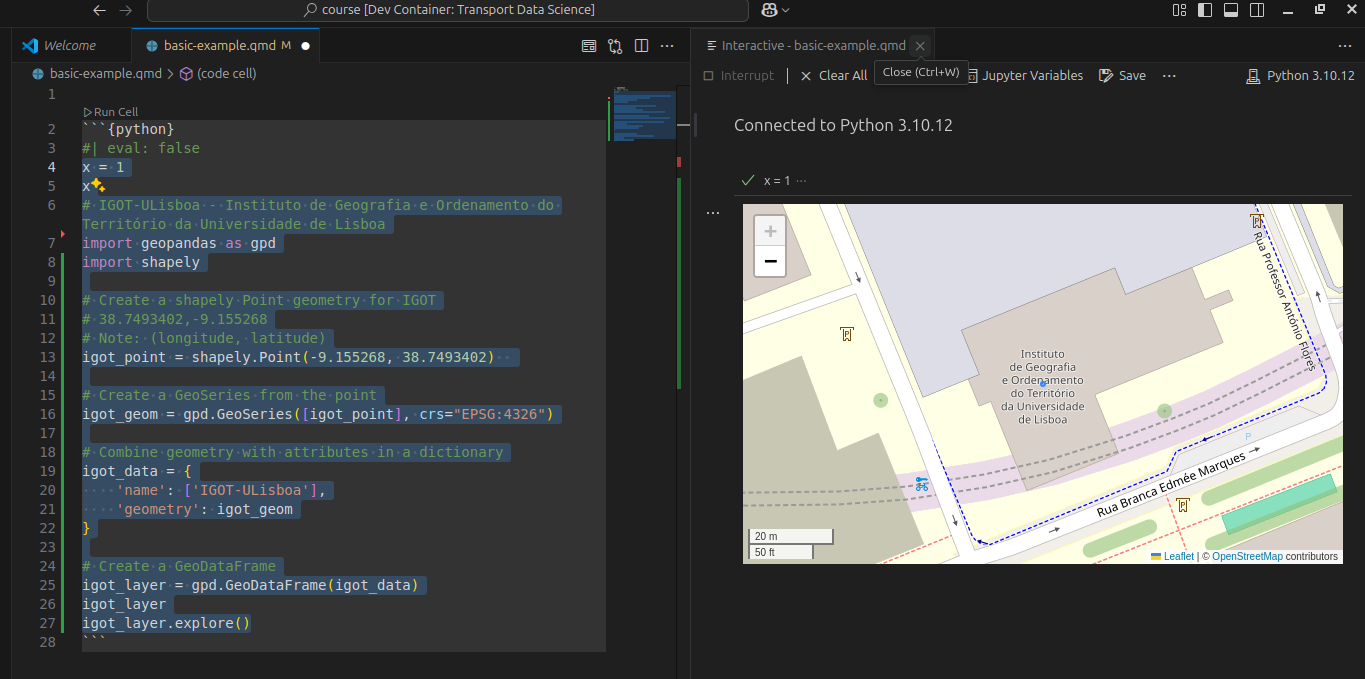
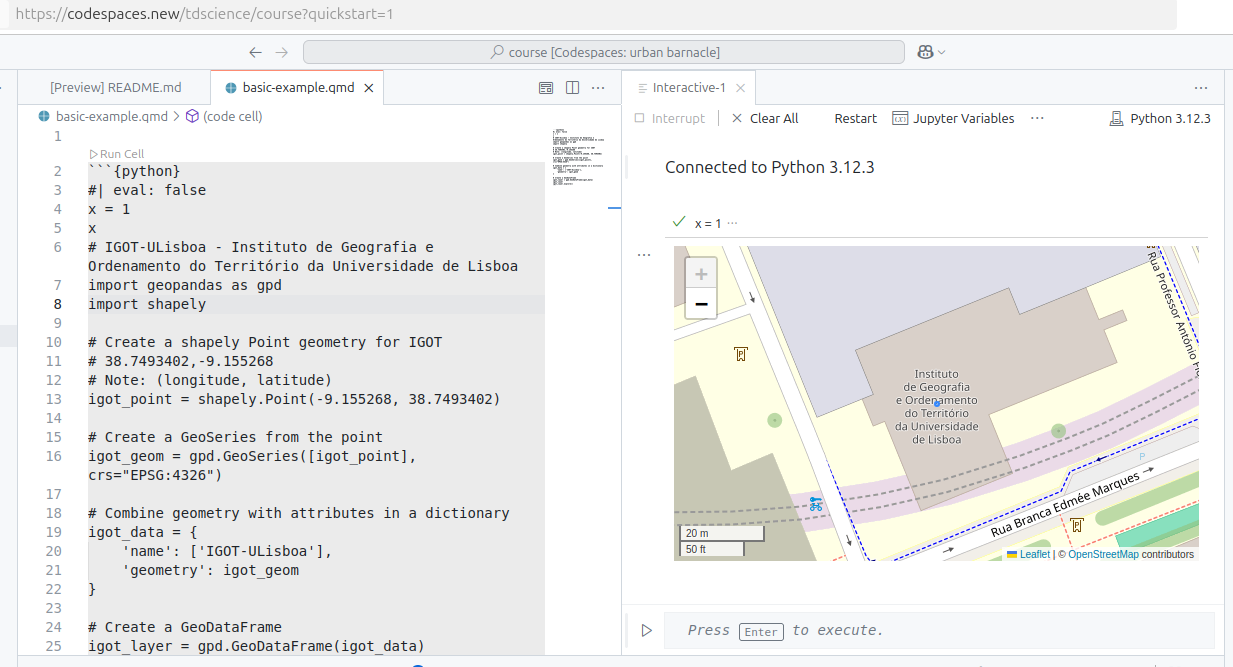
Another advantage of using devcontainers is that they can be used in cloud-based IDEs, such as GitHub Codespaces. See Figure 4 for an example of running a .qmd file inside a local devcontainer.
Bonus exercise: Try running the code in basic-example.qmd in GitHub Codespaces.
Figure 4: Running the code in basic-example.qmd inside a local devcontainer
Codespaces is a cloud-based development environment provided by GitHub that allows you to create, manage, and share development environments directly from your GitHub repositories, as illustrated in Figure 5.
Figure 5: Course content rendered in an interactive Python cell in GitHub Codespaces
You can create a codespaces instance from any GitHub repository with the following URL pattern:
So for this course, you can use https://codespaces.new/tdscience/course?quickstart=1 which is the link below, a good thing to add to your GitHub README files (see README.md):
Open in DevContainer
2.4 Python interpreter
VS Code-code based IDEs, including VS Code and Positron, allow you to select the Python interpreter you want to use for your project. You can choose the version of Python to use in the dropdown menu in the Select Python Environment button that appears when you run Python code inside a .qmd file (Figure 6).
Figure 6: Select Python interpreter menu in VS Code which appears after running a line of Python code in a .qmd file
3 The system shell and basic commands
A system shell is a program that acts as a command-line interface (CLI) to an operating system. It allows you to interact with the computer by typing text commands and executes them by passing them to the operating system’s kernel. The shell is where you can run scripts, manage files, and execute programs.
The commands will depend on the operative system you have in your computer. Windows use the Windows Command Prompt or PowerShell, while macOS and Linux use Bash/Zsh.
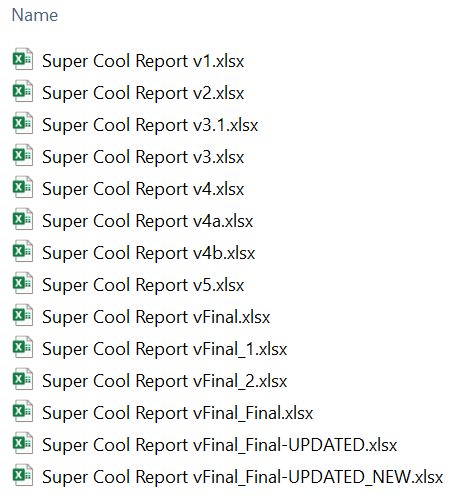
Working with any type of digital file usually involves preparing it, revising and editing its contents, and sharing with others to get feedback. After completing at least one round of this process you can end up with several different versions of the same file. Are you familiar with Figure 7?
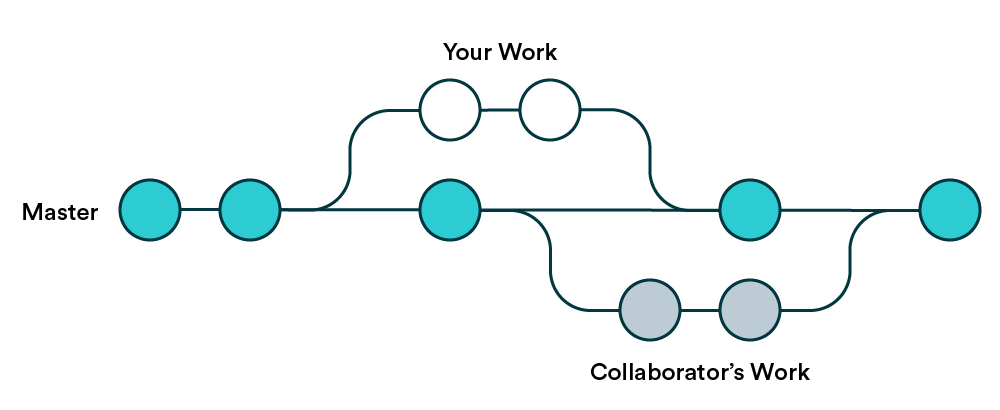
Git is a great tool that tracks changes to files over time, especially in text-based files such as scripts, allowing multiple people to work on the same project without overwriting each other’s work. When Git is used as a version control system, a full copy of the entire project history is stored, making it easy to keep track of any changes, and even revert any changes. By using Git, it is possible to have different alternative versions of the same project, i.e. repository, without the need for independent files or folders for each version.
GitHub is a platform that provides hosting for Git repositories. As a cloud-based service GitHub works as a Hub for storing, sharing and collaborating with others. Some tools in GitHub, like pull requests for proposing changes, reviews for asking others to check your work, and issue tracking for monitoring things to be corrected or improved, ease the collaborative work in different projects. Other features (GitHub Actions) allow the automation of different processes, for example, building a web, and testing and deploying code.
To learn more about the different elements in GitHub, you can start exploring the GitHub skills courses.
4.3 Working with GitHub
Any Data Science project will benefit from having a clear file structure. The starting point will be a folder (a.k.a. repository) in which we will store the code, data and other relevant files. We are going to use both Git and GitHub for keeping track of all changes.
You might already be familiar with some key terms in a typical Git workflow: clone, commit, push, pull, or branch. Here is a useful cheat sheet.
There are two main ways of working with GitHub repositories in your machine: the gh command-line tool from the shell and the GitHub desktop graphical user interface. It is also possible to use the built-in IDEs’ extensions, but they generally have fewer features available. We will explore the different actions in the next session.
Note
You should have at least an IDE and a tool for using GitHub installed in your computer now. If you still need to install them, check the prerequisites for more information.
5 Exercise
Open the shell and move around and explore your file system with the following commands:
cd <directory_name> to change directory
ls (macOS/Linux) or dir (Windows) to list directory contents
pwd (macOS/Linux) or cd (Windows) to print working directory
Create a folder called reproducible-research at a place of your choosing and open it with your IDE.
Create a folder called github in your home directory if it does not already exist, add a subfolder called tdscience, and clone the course repository from GitHub to that location.
Installing the gh command-line tool
If you do not have the gh command-line tool installed, you can follow the installation instructions for your operating system on the official website: cli.github.com.
The first time you install the tool you should run the following command to authenticate with your GitHub account:
gh auth login
# Make a folder in your home directory for github repos:mkdir ~/github# Make another folder inside that directory:mkdir ~/github/tdsciencecd ~/github/tdsciencegh repo clone tdscience/coursecode course # open the course folder with VS Code
Create a new repo in your GitHub account called eitcourse with the command gh repo create.
That repo can be where you will save your work during the course.
Open this newly created repo in your IDE and create a new file called basic-example.qmd. Add any content you like and try to render it.
Render or preview the file in your IDE, using a shortcut Ctrl+Shift+K or from the terminal with the following commands:
quarto render basic-example.qmd# orquarto preview basic-example.qmd
Note
To stop the preview server, press Ctrl+C in the terminal where you ran the quarto preview command.